Thursday, May 2, 2013

Art Journal Good Times Happy Hour!


Who isn't art journaling these days?  You?  Why not?  It's exciting!  It's freeing!  It's such a fun process that really releases you to think more creatively.  Which helps you all around, right?  Right! 

Why am I talking up the art journal craze?  Because I've been on an art journalling craze- that's why!

In addition to my own 'personal' journal, I'm doing two art journal 'swaps.'   I'm a member of the art journal group at a local shop, Paper Crown, and I'm involved with a thru da mail version with a group of BFF's (as the kids say) from Scrapbook.com.  Speaking of my wimmins, we all met up, recently, to shop the town red- a couple were even from out of state!  What a commitment to fun is that?!   Here's a picture of us:


Aren't we classy?  Well, we are.  And FUN, too! 

Okay, back on topic:  At first, I was worried about doing pages in someone else's 'journal.' (And is it still 'your' journal if other people are doing pages in it...?   I don't know.  I'm not here to get technical.  I'm creative, dammit.)  I was worried about either not doing something 'worth it' or 'cool enough.'  Then, I thought, "KORY! Why WORRY?  You don't worry about wandering around the parking lot of your apartment complex, in your boxer shorts, to dig through a dumpster while juggling a Gatorade bottle* full of boxed wine SO WHY worry about your page not being 'cool enough'?!"

So I listened to whatever that is that presents itself as my conscience and I threw my worries, along with tons of Distress Paint, to the wind.

I would be lying if I said I don't plan anything out before starting a page.  I do have a plan of some sorts- usually a vague idea.  Sometimes, I do approach my worktable with a grand scheme but I surprise MYSELF and that blueprint is abandoned for something wildly new that is even better!  And that, people, is another reason (Is that just Reason #2? I lost count.)  as to why I love art journaling. 

I DO have techniques, of sort, to jump start an idea, however.   In the sliver of a chance that my technique will work for you, I'll share!

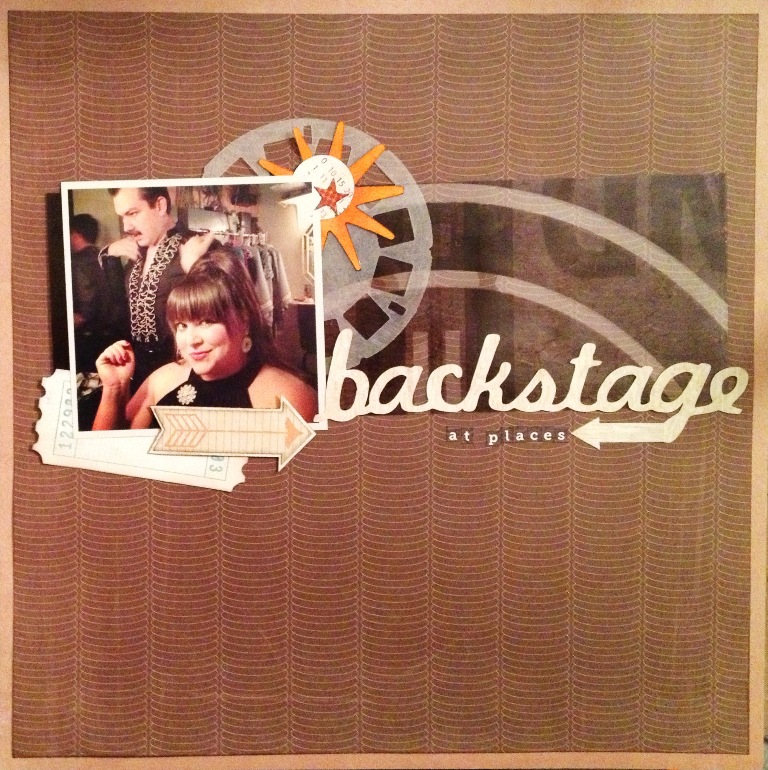
Project Number One:  My Paper Crown layout for April.

With this group, we're given a theme.  April's theme was 'Birds.'  The first thing that popped into my head was the ancient Greek comedy, The Birds.  By Aristophanes.  Remember him?   Immediately, I knew that I wanted to do some kind of 'scene.'

Before I did anything else, I started up my 'Art Journal Technique NUMBAH ONE!'

Art Journal Inspiration Technique NUMBAH ONE:  Pre-Art Inspiration Search! 
Take your inspiration word and head to Google.  It's kinda like when you play Dr. Google and try to diagnose your real or imaginary illness.  Only it works.  Instead of spending the day coming to grips with your freshly diagnosed terminal illness, you actually accomplish something. 

For example- the inspiration word was 'Birds.'  And because that inspired my inner-Google (brain) to think Arisophanes' Birds, that's what I typed into Mr. Google.  Then, either write down words or quotes or ideas that jump out at you from the search results OR click over to Google Images and see what kind of visuals/photos/drawings/colors grab your eye. 

From there, you'll be a bit more organized in your thoughts/ideas and when you browse through your box of collage clippings or stash, certain things you didn't think of before just might make sense to you!

Here's some close-up views of my BIRDS layout:


Looking at it now- I hate those flippin columns.  I jes' might come up with some idear to replace them, the next time our group meets up...

That was my Paper Crown layout- now, onto the 'PayDay Friday' art journal club!

There's no set theme for each round with this journal.  That kinda makes getting started a little bit tougher. 

Yeah, I know- I know.  A moustache.  I know what you're saying.  "Kory!  That moustache is OVER.  It's the new octopus and it's already old."

Well, to you, I say, "Oh, go sit your hexagon ass on a chevron.  I like the moustache.  Almost as much as I like the image of the guy flying around with his umbrella.  So there."


This page was put together without a plan at ALL.  I was digging through my plastic bin of collage materials and came across a stack of pictures of hideous food that I clipped from an old cookbook.  That reminded me of my second biggest fear:  eating so many Little Debbie's Zebra Cakes that firefighters have to tear a wall down and lift me out of my apartment with a crane.  What's my first biggest fear?  Eating so many Little Debbie's Zebra Cakes that Richard Simmons runs up to me and starts hugging me and crying.  How else to express these fears than with a moth/broken stature/jumping boy standing atop a mountain of 1960's food reaching toward a black pearl?


Here, above, you can see slightly sinister gingerbread men, climbing the food mountain.


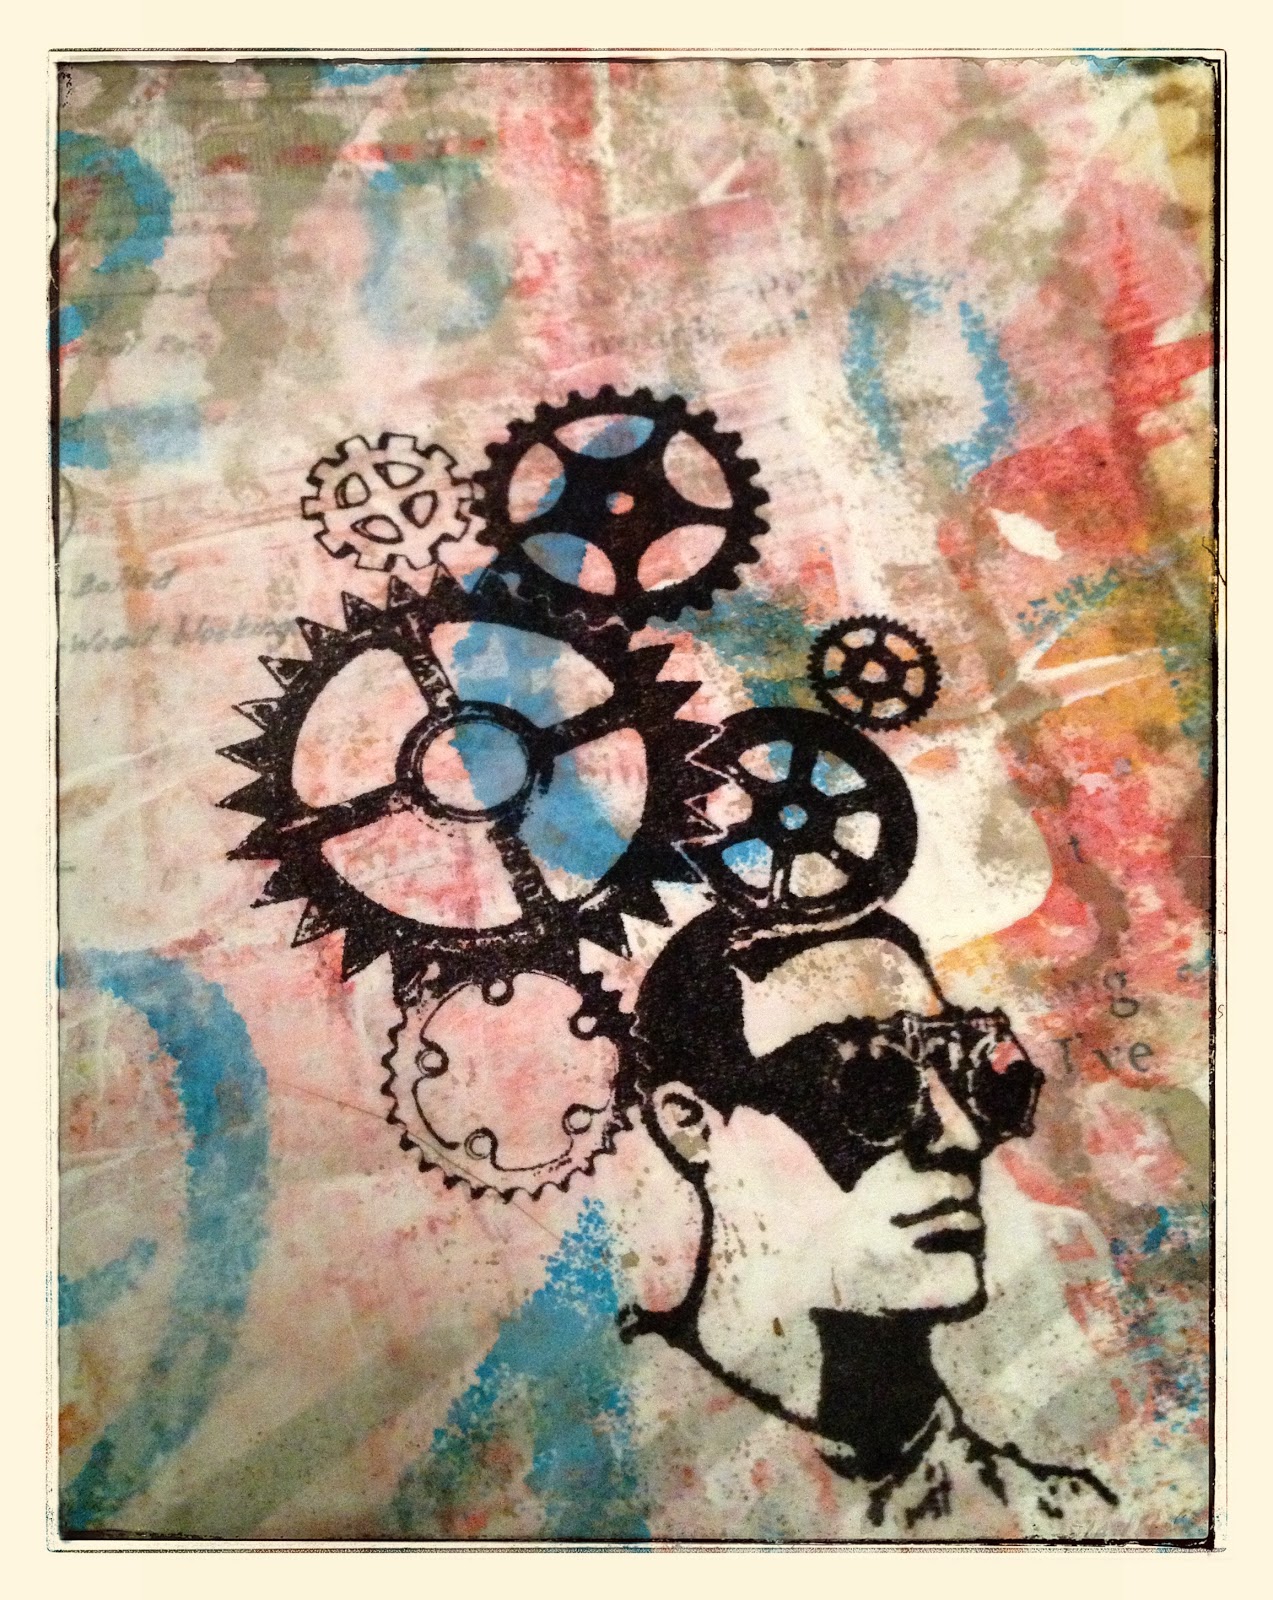
Another of my 'no plan/no inspiration to begin with' pages.  Again, I'm obsessed with this little umbrella man.  He just looks so happy to be flying around with his umbrella and suitcase.  And moustache.  I applied him with the acrylic paint image transfer technique, over many layers of Dylusions spray inks, scraped blotches of paint, Distress Ink, and body oils.


I made a tag for the bottom right of the page.  On the way to an all-day technical rehearsal for the last play I was working on, I stopped in at Hobby Lobby.  I picked up Mr. Holtz's moustache die!  I love it.  I used it to cut grungepaper and heat embossed it with American Craft's Aqua embossing powder.  I added a couple of charms I had in my treasure chest.

Okay, I've got too much to do today.  It's May 2.  It's 38 degress.  And I need a jump-start.  You know:  a diet pill and a cup of coffee.  See you later!

-kory k

Monday, April 22, 2013

and the great Viewmaster trend rages on


WOW!  I've been BUSY.  I'm not kidding.  Usually, when you hear someone say they've been 'just TOO busy,' they go on to tell you about how they went to work all week and to a movie and washed their car then HAD to get caught up on their favorite TV shows all weekend, so they didn't 'have time' to do such and such... 

To those people, I always want to say:  "THAT'S NOT BUSY!!!  THAT'S RELAXING!" 

My fabulous scrappy friend, Darla, has been saying that I've been burning it on both ends.  No, Darla, I've actually been burning all the ends, not just two.  Ha!

So what have I been doing?  Working on a show, helping with a new play festival, working working working- and dealing with a truck that decided it just doesn't think it needs to retain its brake fluid.  Truck, meet fence.

But the show has closed, the play festival picked its winner, and the truck is sitting proudly next to the fence it killed.  I'm not kidding.  The truck asked me to have the fence mounted, so it can hang in the den.

One my one free evening last week, I knew I NEEDED to relax and clear my mind with some scrappy therapy.   A lovely Studio Calico community member, ShannaNoel, inspired me with a layout by another member, JustNick, called HELLO TODAY

As I was at that moment of wanting to scrap but not knowing where I wanted to start,  I decided to scraplift it for a creative jumpstart. 

When I began digging through one of my big boxes of embellishment stash, the 'viewfinder' die cut from BasicGrey's HELLO collection's package of 'Photo Frames,' jumped out at me.


BasicGrey's sexxxy acetate die-cut from the HELLO collection.

I studied it for a long time, trying to determine its fate.  I know, I shouldn't hoard these things- I buy them to USE, right?  But it's just too freakin' cool!  The plasticky look and transparent wonder of it all-  well, I couldn't use it- I planned on having it peeking out from behind something, so I couldn't justify its use.  Yeah, that's a big crazy, but I'm not above being crazy. 

Then I remembered:  I have the PICTURE WHEEL die from Tim Holtz!   I grabbed a sheet of acetate, grabbed the die and my BigKick and cranked it out. 

The only problem now?  I have a perfectly clear and shiny thing next to the classy matte beauty of BasicGrey's inspiration piece.  Oh!  Sandpaper!   With the help of Mr. Holtz's sanding block, my dreams of unlimited acetate 'picture wheels' became reality.


Sure, it doesn't have the printing that BasicGrey's piece has- even though I considered using some rub-ons and rubber stamps to finish the counterfeiting action, but in this moment of just wanting it peeking out from behind part of my layout, this is perfect!  It even has the same translucent matte feeling.  After french kissing my discovery for a few, I continued on with my page.


I'd been wanting to scrap this favorite photo for quite a time.  It's a pic that I took backstage while working on the show, "PRESLEY TWEED: ONE NIGHT ONLY FOR TWO NIGHTS," back in October.

The long strip behind the photo and title is cut from a 12x12 printed transparency.  Over a year ago, I bought a 25-pack of these movie-film transparencies at a Tuesday Morning for a 1.99.  They remained unopened until this night.  Don't you love that feeling of 'I KNEW that one day that would come in handy!'?  I do and I don't.  It's exciting, but then it validates my hoarding desires. 

I made the layout using mostly BasicGrey.  Since I bought at least one of every item in BasicGrey's exclusive JoAnn lines, Hello, Hey There, and Hey Boy, I thought I should try to use some of it up!

For the big word of the title, 'backstage,' I used my beloved BILLIONAIRE cartridge (What a font that little critter gots!) and the Cricut CraftRoom to weld the letters together-  I also cut the starburst shape while 'experimenting' a bit.  It was cut from some bright manila cardstock, but I liked the shape enough to color it with Spiced Marmalade and Rusty Hinge Distress Inks and added it to the layout.

That's it for now- I've gotta go stand by the mailbox and wait for my SILHOUETTE CAMEO to arrive, thanks to the good people at Massdrop.com.   Did you follow my advice and buy one of your own?  I know a couple of you did, as I heard from you- but if you didn't get a chance, go over there and 'request' the buy again- who knows, they might hear your pleas! 

-kory k

Wednesday, April 3, 2013

A SILHOUETTE? A SILHOUETTE!


Can you believe it?  I still don't have a Silhouette and I'm still crying about it...

I can't help it-  every time I've somehow forgotten my overwhelming and all encompassing need for a SILHOUETTE DAAAAAANGIT, I set my eyes on another amazing cut over at Studio Calico's blog.  And, as they say in The Lion King, the circle of life begins again...

Anyways, you wanna hear about a great deal on a Silhouette?  I'll tell you. 

There's some great guys at a website called MASSDROP.com.  They've heard about the Silhouette from a few of us papercrafters and have put together a great deal-  not only a great price on the machine- 199.00 (!!!), but 12.00 shipping?!  PLUS your choice of three accessories!   It's too good to pass up, I tell you.

Check it out at:  http://www.massdrop.com

I'm editing, here-  the posting for the Silhouette sale just got even better-  so I had to re-edit and pass this on!

Here's what you get:

  • The Silhouette Cameo


  • 12" Cutting Mat


  • $10 Gift Card for the Silhouette Online Store


  • 51 Exclusive designs


  • Cameo Studio Software


  • USB and power cables


  • A 10.00 gift card to the Silhouette store!  Even better!!!

    BUT THAT'S NOT ALL, as my favorite infomercials scream!

    You may also choose three of these accessories:
  • Additional $10 gift card for the Silhouette Online Store


  • Extra 12" Cutting Mat


  • Silhouette Spatula


  • Scraper Cleaning Tool


  • Fabric Blade


  • Sketch Pen Metallic Pack (4 pens)


  • Sketch Pen Starter Pack (8 pens)


  • Dust Cover (Grey, Neutral, or Teal)


  • Tattoo Paper


  • Sticker Paper


  • I would definitely pick the extra cutting mat, the additional 10.00 gift card to the store, and the fabric blade.

    Sorry about all my excitement, but this deal just keeps sounding better and better!

    About logging into MASSDROP.COM - It's as easy as can be-  I just used my Facebook login, which seems to be all that I use my Facebook account for, these days.  But you don't hafta use that, you can just make your own log-in for the site. 

    I'll be back, later, with a tip for washi tape storage and display...and who knows, maybe a joke or two.  Until then, grab a Silhouette!

    -kory k

    Tuesday, March 19, 2013

    Cardmaking and Paintingmaking and and and

    Sometimes, my life turns into a hurricane of activity.  Except not as much fun.

    When the storm clears, and the air calms and I'm left sitting amidst a pile of debris- however, I think, "Wow! That was fun!  Let's do that again!"

    It's a horrendous cycle of abuse.

    The new play that I'm stage managing opened last week.  That's stressful enough, on its own!  But even without being able to sleep for a week, I still managed to find fifteen minutes to sit down and make one of my 'Fifteen Minute Cards.'  

    No, I don't time them-  it's an estimated average.  They might not even take fifteen minutes. 

    What I've found, about my cardmaking, is that the less time I have to obsessively move layers of papers around, the better my card turns out!   So that's some advice, from me, if you're having trouble coming up with a design.  Tell yourself that you've got fifteen minutes, total and at most, to make a card, and if you don't finish it in the allowed time, then you'll die or be late to work (whichever is more frightening to you). 


    I needed a birthday card for my beloved boss- and since the first day of spring is (too freakin) near, I wanted something with a spring theme. 

    To speed up the process, I used a tip that I picked up from May Flaum's e-book, FASHIONABLY FAST- which is available from Big Picture Classes.   I'm preparing a review of the book, as not only were they so kind to include me when sending out review copies- but also because IT IS A GOOD BOOK.  What's the tip I used?  Well, actually I used two- but the main tip I used, which to be fair is a tip I've heard a couple of places so far- is to use one line of product.  I don't know about you- but sometimes I just need to be told the most obvious of things.  If you don't have time or the skillz to match papers, just grab a collection pack!  Too easy, huh?  Yeah- that does kinda take some of the fun out of it (for me) but if you're in a hurry or if you just want to concentrate on the layout instead of the color- well hell, make it easy on yourself and grab a collection.  Nobody gonna judge you.  If they do, remind them that you know what they did last summer. 

    I used BasicGrey's FACT AND FICTION - you know, that line that I went crazy for at JoAnn.  Not only did I buy every bit of it- but I bought multiples.  I'd be back at JoAnn and see it on sale and I can't pass that up-  aaaaaand I'd think, "Hmm. I don't think I got that, anyways."   Imagine my surprise to find five of each thing when I tried re-organizing not too long ago...

    So that was the only 'technique,' to that card, really-  I chose a collection (Fact and Fiction) that had the look I wanted at the moment, picked out the appropriate sentiment- Happy Birthday, from a sentiment set that I picked up on clearance at Hobby Lobby for a dollar, and layered a few embellishments.  The bird was part of a larger journal card- but I really liked that bird (and my boss LOVES birds) so I cut him out.  Cuz that's allowed. 

    What else have I been up to?  Really?  You're still here and you want to know more?

    I've been learning how to paint with WATERCOLORS! 

    I can't tell you why I thought it was something I wanted to know more about-  it just occured.  I got out a pad of watercolor paper and my paints and did a Google search for a tutorial.  I don't know about you- but in the past, to use watercolors, I wet my brush and rubbed it on the little cake in the plastic pan, then rubbed it on the paper.  HOW DO THESE PEOPLE MAKE THOSE BEAUTIFUL DREAMY PAINTINGS?!

    Imagine my surprise to learn all about adding water, mixing trays and etcetera!

    Following along with an online tutorial, I set out to complete a watercolor.  Here it is, my first attempt, ever:


    I promise, I'm not deluded into thinking I'm a master painter or anything- but it sure looks better than I thought my first attempt would look like! I'm sorry I can't find/remember the link to the tutorial - I will find it and add it, as I want to credit the site responsible for all the fun I had, learning a couple of things!

    I struggled through a coupla more tutorials- fish, a flower, a butterfly, an unfortunate mountain landscape... finally, I decided I wanted to try something of my own-  my first complete original watercolor.  Of course, I chose to paint a portrait of my beloved son, Nelson. 


    Given my limited drawing and painting skillz, I naturally opted for a more 'wiggly abstract' look, than attempting any sort of photo-realism!

    Okay, I've got work to do and teeth to make (prop teeth- no, I'm not an at-home dentist) and collage materials to cut out:


    Come on over and play, if you'd like! 

    -kory k


    Monday, March 11, 2013

    Making Your Own Masks and Primitive Stamps!

    What's Kory been up to, for the past week or so?  Well, besides working on the new play that will open this Friday night- I've been playing around at my desk and making my own masks! AND I've been making my own 'Primitive Art Journal Stamps.' 

    If you know anything about me, you'll know that I've been making these things out of either trash or stuff from the Dollar Tree. 

    First- the masks.  Stencils.  Whatever you want to call them, you know what I'm talking about:  those trendy plastic things you spray yo' Mister Huey's and Dylusions through so's you can put some purty patterns on your paper.

    I love these things.  I own a big and always growing pile of them.  They're more addictive than Spellbinders Nestabilities. 

    Masks and dies always remind me of that joke:

    "You've taken morphine?!"

    "Well, once, after my surgery.  And then every day for three years after that..."

    Anyways- enough of Kory's Comedy Hour.

    Masks.  I love masks.  And I love the silhouette masks that the amazing Ms. Dina Wakley uses-  but I was wanting a 'boy' mask.  Believe it or not, I don't run around in a skirt.  Speaking of 'man silhouette masks,' - Ms. Dyan Reaveley has just released one- the 'Bert' stencil.  But I haven't seen it in a store, yet.  You know I'll buy it the minute I do!  But in the meantime, I made my own.

    How did I make my own? 

    It's easier than you think- and you don't even need any artistic ability.

    There are all kinds of classy designers who are making some amazing graphics.   Go to Google Images, and search for,  "free silhouette vector graphic," or some variation of that-  and you'll find pages of royalty free graphics. 

    Pick out your favorite one.  I printed mine at several different sizes- full size, 50%, 35%... just so I could have some options.  I like options.

    I traced the shape with tracing paper- you can do this or you can just use the printed shape.  Cut a rectangle of clear plastic product packaging big enough to cover your shape plus a good border.  I used the plastic from the Spellbinders packaging.  I save all plastic.  You can always use it for something!  I don't do this out of some kind of devotion to the environment.  I mean, I do love the earth, really, I do- but when I'm dead, what's the environment gonna do for me?*

    *Totally kidding.  Sometimes, I even through a can into the recycling bin at work.

    Where was I?  Oh yeah.  So- you trace the shape onto your plastic.  I used a black paint marker.  Not for any specific reason other than it was the nearest marker- but obviously, you want to use something that won't schmear.

    Also, I taped the plastic to the tracing paper and my desktop so it wouldn't slip and slide.  Oh! Remember the Slip 'n Slide?   The best thing to happen to childhood in the 80's. 


    After you've traced the shape all that's left to do is cut out the inside of the shape!  I tried to cut it with my Exacto, first.  The Spellbinders plastic was a bit too tough.  As if I have to tell anyone who has ever tried to open the flippin' things.  Instead, I punched a hole in the center of the shape with my Crop-a-dile and used scissors.

    Ready to see my test result?


    WORKED!!!  

    Whoooooooo!!!!  Unlimited masks for me!!!

    Of course, I won't stop buying them- but now, I've got OPTIONS!!!

    But I thought, what a great idea, in case the stock market ever crashes, and I actually had money in the stock market.  I'd be okay.

    What else have I been making?   Well, you know I've been on this art journalling jag-  and I've been looking at lots of books from the library about art journalling.  I love looking thru books.  And the library- well,  "I don't know if any of you people read."   BUT-  the thing about the library.  It's like going to Barnes and Noble, except that everything is free.  

    Anyways...  In all these books, the writers go on and on about how great and easy and classy it is to make your own stamps.  All you hafta do is buy blocks of carving rubber and carving tools and suddenly become coordinated.

    I wanted to make my own stamps.  But I also recognized my own limitations. 

    So here's how to make some 'Primitive/Negative Art Journal Stamps.' 

    Go to the Dollar Tree and get a package of 'fun foam.'   It comes in a package of about twenty or thirty 5X7 sheets.  For a dollar.  That's a bargain.

    Now, come up with a shape or design- and with a fine tipped stylus OR a ball point pen, draw your design onto the foam.


    See that?  Just draw the design onto the foam.  It presses in and stays.  My first attempt, I drew a woodgrain pattern.  A bad woodgrain pattern, that is, but I'm fond of it: 


    Also, note where I tested out my new Amy Tangerine calendar stamp.  Neat, huh? 

    I also like how this method of "makin' stamps" looks like a strange printing/negative look.  Love it!

    I did a few more:


    and:


    and:


    Of course, I had to try out another silhouette!   But my 'by hand' version of the shape turned out a little alien-like. 

    That's what I've been up to, people!

    Oh wait, there is something else I've been up to-  for my theatrical career-  making TEETH! 


    There's a scene in this play (that opens THIS FRIDAY, get yer tickets NOW!) where the lead character uses a pair of pliers to pull out a tooth.  Onstage.  So, I've made these fake teeth- and with some Antique Linen Distress Ink and some Picket Fence Distress Stain... they look real, ladies and gentlemen.  Combined with the blood and the stage lights-  you'll be horrified.  I guarantee it.


    -kory k

    Tuesday, February 26, 2013

    Non-Traditional CraftRoom Storage and Workspace

    I really didn't know how to title this post-  'Non-Traditional CraftRoom Storage and Workspace' was the best I could come up with-  because, basically- that's what this post is about-  storage and work surfaces from stores you don't usually think of when you think something like, "Where am I gonna obsessively sort and line up all the bottles of Dylusions?!"

    If you're anything like me, the next best thing to blowing your paycheck on every new item fresh out of CHA is taking all the new product home and 'PROCESSING' it...  You know what I mean- to 'process' your new craft supplies-  you take off the price tags if they're covering up the nice packaging art, you remove any plastic shrink wrap from paint bottles/mists so that they're ready to go when you're in a rush of inspiration, you keep the embellishments in their packaging but sort and organize them into their appropriate storage area... That's PROCESSING! 

    But sometimes, when you buy a bunch of new product, you decide it's just too purty to go into that old Dollar Tree bin and you need to upgrade to a bin from Dollar General.  Or, if it was a Kory-style shopping binge, you just need MORE STORAGE.

    SO: Where to get great storage?  At Michaels, their beautiful, all-white storage bins look great- but even buying one section a day with your 40% off coupon (if they're not already ALL 40% off, that is) it's still going to take a dent (or obliterate) your crafting and entertainment and pharmaceutical budgets, combined!

    I know it is not a BRIGHT NEW IDEA to pick up storage or storage ideas from non-craft related shops- but still, I'd like to share with you some of the great ideas that I've come up with or come across-

    First up- the spinning and organizing wonder that's taken the craft world by storm:  Harbor Freight's Revolving Four Tray Bin .


    This curvaceous beauty probably caused quite a bit of wonder to Harbor Freight, once it hit Pinterest and crafters descended on bewildered employees, crying, "WHERE IS THAT BIG CHEAP SPINNY CRAFT THINGYYYYY?!"

    They only had one left on the floor when I made my trip to Harbor Freight.  They were also confused as to why they were almost all gone.  Luckily, a helpful employee found one in back for me.  And let me add- this helpful employee was a woman.  The first employee I asked, a man, sort of grunted and scratched half of his body before telling me, "If it ain't there then we're out." 

    Luckily, I remembered my Mom's helpful advice, "If you really need something done, ask a lady." 

    If you're not happy with the black steel color, as I am, you could always do what many other great scrappers have done and cover it with different washi tapes! 

    Here's the now famous spinning rack in my craft room, in a very rare clean and fairly organized state:


    How handy is that rack?!?!  I know, I know.  See that giant Martha Stewart cutting mat, under my nonstick craft sheet?  I found that at Big Lots for 3.99.  I saw it in Michaels, later, for over fifty bucks. 

    Speaking of my own craftroom organizational work, let me introduce you to my pegboard.  Not just any pegboard, but the less than ten bucks pegboard.


    Growing up, my genius and very artistic father had an incredible workshop and woodshop- filled with every tool and machine you could imagine- and everything was organized in labeled bins and walls of pegboard with a hook for everything.  So I've always had a love for pegboard.  It just looks so damn sexy when things are hanging from hooks.  It looks even sexier if you have enough pegboard to hang new product from- so that after a few cocktails, you can gaze through a boozy fog and pretend you're standing in the middle of your very own scrap STORE and then the doorbell rings and you don't remember ordering more product-  okay, sorry, enough of my sick and twisted fantasies.

    How'd I make the pegboard?  I went to Lowe's.  I picked out the pegboard and found pre-cut 1x1 boards that were of the same measurements as my board.  Once I got home, I nailed (with tiny black nails) the pegboard to the 1x1s, to provide both stability and a surface to attach hanging hardware.  When I was done attaching the board to its 'frame,' I decided that, until I make two more pegboards, I'll just lean it against my wall.  It's secure enough, so I'm fine with that until I'm able to complete my 'triptych of pegboard organizational wonder.'

    There's some close-up 'action shots!'  See that collection of roller date-stamps?  That's sick, isn't it?  Just plain sickening.

    What are some other hot items, you ask? 

    There's the RASKOG from Ikea.  You've probably seen it pop up on a few blogs.  It's hot.


    Another thing from Ikea, that I spotted and thought would make a TERRIFIC workspace surface, especially for someone with limited room that needs all the space they can steal- the VIKA VEINE:

    The top lifts up!  Space to work on and space to store AND/OR work on- you pick!  The VIKA VEINE is priced at 79.00. 

    Back to HARBOR FREIGHT, now, for what is probably my favorite of all and the one worktable that's sure to end up in my space, ASAP IF NOT SOONER.  Check out this wonder:


    Classy, huh?  PEGBOARD!  LIGHT! TWO DRAWERS! STORAGE SHELF UNDERNEATH AND TOP!!  Most of all, the biggest turn-on:

    OUTLETS!  Perfect for your heat gun, your iron, electric die cutter- whatever, I'm sure you can imagine what an outlet could be used for- but, the possibilities!!!  Best of all, it's 99.99.  And Harbor Freight often has coupons and sales that can make you weak in the knees.  If you're into that kinda thing.

    Another worktable option, which I spotted in a coworker's catalog this morning, The 'Outdoor Multipurpose Bench,' from GINNY'S.


    This one has plenty of flat storage surfaces, looks lightweight enough visually- and isn't too bulky.  Also, I hear it's sturdy.  AND- check out the built in paper-towel holder!  It's a bit more expensive than the others, at 159.95.  Who knows, maybe it'll go on discount or maybe you just don't care- but you can see more at Ginny's.

    Well, that's it for what I've got- what about you?  Seen anything I need to know about?  Let me know!

    -kory k

    Friday, February 22, 2013

    Encaustic-esque Good Times!

    Last summer, I was so freakin' lucky to attend a class taught by Dina Wakley.  It was life-changing.  No, not becuase I burned my finger.  Because I REALLY learned things.  A ton of thing.  Yeah- a TON.  You know you love it when I exaggerate.  But I'm not this time- it was a TON of things...

    The class was her 'Encaustic Tag Book' class, which I read (I think?) that she recently taught the class for the last time.  So if she taught this class near you, and you didn't take it- well, I hope you know how sad that is...

    From the sound of the word, I thought 'encaustic' would surely involve some kind of toxic chemical- possibly some kind of explosive.  But it doesn't.  You know what it means?  Good.  Tell me.  I don't know, and I'm too lazy to research any further.  Just know:  it involves wax.  No, not that way, filthy pervert.  And no, not that way, either, Chewbacca.

    From the bit of 'research' I did do- there's lots and lots of encaustic-ness going on-  there's painting, and there's collage... and.. well, collage is where I'm interested.   Also, while doing this 'research,' I came across this disturbing line:  "About a year ago, R and F came out with an Encaustic Gesso- it doesn't smell as bad as rabbit skin gesso."

    WHAAAAT?!?! GESSO IS MADE FROM RABBIT SKIN?!

    Immediately, my life flashed before my eyes-  I see each and every moment I've worked with gesso.  I see each and every moment that I've stuck a finger in my mouth to get a bit of Mother Nature's natural blending solution (saliva) and rubbed my fingers all over the RABBIT SKIN.

    Just as a co-worker began to rush to my screaming side and offer assistance, I finish reading:

    "rabbit skin gesso...and unline ACRYLIC gesso....."

    Whew.  That was a close one.  I know for sure that my gesso is acrylic.  I remember seeing that on the bottle.   But WHAT sicko learned that gesso could be made from the skin of adorable little Peter Rabbit?!  Or all the Cottontail bunnies?!

    Anyways.

    I've somewhat adapted the way I do my encaustic collage and, mostly- it really is just the same.  Don't copy me- as it could be dangerous.  And when the firemen pull the one household object that survived your fire- don't say "BUT KORY SAID I COULD USE A 10.00 IRON FROM WAL-MART TO DO IT!"  Because I didn't.  And if your Mom didn't teach you not to jump off a bridge just because Kory does it, well, you deserve what you get.

    Now that the disclaimer is out of the way, here's my latest, Miss Dina-Inspired project- 

    AN ART JOURNAL PAGE!


    Upper left:  Here's my 'altered book/art-journal in progress.'  Most of the pages have white paint randomly smeared across- and left, there's some blue Dylusions that soaked thru...

    Upper right:  I began by tapping my Barn Door and Broken China Distress Paints on the upper part of the page.

    Bottom left:  With a mini-mister, I spray the page a coupla times.

    Bottom right:  Take an old Wal-Mart gift card and smear your paints down, across the misted page.

    I decided to add a bit more color- so I add some MUSTARD SEED Distress Paint.  I LOVE DISTRESS PAINTS- aren't they bottled gifts from heaven?!  Yeahp. Just like vodka.

    Then it just looked WAY too bright- so I add some white acrylic paint.  I smear it on with the gift card, too, and scratch part of it away with the corner of the card.  Colorful, isn't it?  It's my latest painting, "Muppet Steamroller."

    Yayyy!  Misting!   I used two different number masks from The Crafter's Workshop, and two shades of DYLUSIONALS to mist some numbers on top.   With a borders mask, I add the two brown strips at the bottom- the triangles and the diagonal strips.  I've also added some Tissue Tape.


    I picked out two stamps I like and stamped them onto tissue paper.  It isn't fancy tissue paper or anything- just Dollar Tree tissue paper.

    Okay- here's where it gets dangerous.  Now, you SHOULD be using an encaustic iron or at least one with a thermostat.  Also, you should be using beeswax- not just a candle you pulled out of your emergency or earthquake kit.  But anyways, if you're anything like me, you will turn a blind eye to any and all safety precautions.  I got a ten dollar 'travel iron' from Wal-Mart.  I rub my candle on it's hot little bottom and then press it to my page.  This puts a layer of wax ONTO the paper.  It's magical. 


    Press your tissue paper onto this wax and burn your fingers.  THEN- take your iron and rub the candle onto it again- and this time, iron the wax OVER the tissue paper.  See that?  The tissue absorbs the wax and it's embedded between the layer of wax under it and the layer now over it- and the tissue disappears, leaving your stamped image sort of floating.  It is a beautiful look. 

    There ya go!  My finished page!  I added a sentence of lyrics, too.  I love it- fun and pretty.  And, for me, VERY colorful.  I'm as happy as a hooker in Vegas.

    But why wax the tissue paper onto the piece?  Why not just stamp on it?  You have to see it in person, really, to properly get the full effect.  The wax softens everything and provides incredible depth.  Also, just stamping on those layers of paint, the image just wouldn't look like it does here-  see:

    See that?!   Beautiful!

    Okay- I've gotta get going.  I've got work to do, I can't just sit here and talk to y'all all day long!  Dang!

    -kory

    Thursday, February 14, 2013

    Happy Valentine's Day!

    Why HELLO!   Hap-hap-HAPPY Valentine's Day!

    I'm in such a good mood, today.  Why?  I don't know.  Maybe it has something to do with all the sugar that's pounding through my veins, thanks to all the candy that people have left on my desk.  Or from the cupcakes that Miss Marie made...  Or from the pure sugar I've eaten, straight from the packets at the coffee machine. 

    I love Valentine's Day.  Even when I've not been 'in loooooooove,' I've loved Valentine's Day.  Remember when we were little and pronounced it as 'VALLEN-TIMES?'   I love that...  Every time I hear a little kid say 'VALLEN-TIMES,'  a piecet of my heart thaws. 

    I miss having a party in school, making a Valentine's mailbox, and passing out those cheap grocery store cards in the flimsy envelopes.  I remember thinking somebody was really cool if they were able to talk their Mom into springing for the cards that came with suckers to stick through slots in the card. 

    Oh I love memory lane.  I'm usually drunk driving down it- but today, I'm on the sugar high express. 

    Anyways.  As fond as my memories of cheap grocery Valentine's are- I still enjoy being 'grown,' and making my own cards.  So here's a selection of some of the many different cards I made for this year!


    I loved making these faux polaroid shapes, using a square punch (for the dark gray paper) and my paper trimmer to cut the white rectangle.


    Mist!  Masks!  Washi!  Die cuts!  Stamping!  Wow- how many techniques can I squeeze onto one square card?


    If there's anything cooler than all these date roller stamps that these companies release every 15 minutes, I don't know what it is...


    This one, above, is very simple.  I cut a scrap square of paper into strips on the paper trimmer.  Stuck them on, put a strip of washi (which I'd also cut in half!) and topped with a stamped and cut-out image.  The stamp was from the dollar bin at JoAnn.  How cheap was this card?  Scraps!  Washi cut in half lengthwise!  Dollar bin stamp!


    I got the new blueprint Valentine's stamps from Mr. Holtz/Stampers Anonymous and had to play around with the famous 'wrinkle free distress' technique.  I LOVE playing with Distress Inks on my craftsheet!  I just feel like such a pro, misting the ink with water and smashing the tag down!  Sometimes, I even pretend to be Tim Holtz, and say to Holly, "Remember! Distress is reactive with water!"


    Aaaaand on the last card that I've got to show, right now, you can see where I played around with my Distress Markers, coloring a couple of stamped images.  I love Distress Markers.  Has there ever been a more perfect marker?!  No.  There hasn't.


    If I can manage to snap more pics of the cards I've made, before I head downtown to the theatre tonight, I'll post them-  final weekend of CRIMES OF THE HEART!  Come on downtown and see the show, if you're in town!  Next up:  Tracy Letts' BUG.  

    Lots of love and HAPPY VALLEN-TIMES DAY!

    -kory k